How to Hide Your Personal Information on the Windows 10 Login Screen

If you log in to Windows with a Microsoft account, the Windows 10 login screen shows the name and email address for the last user that logged in. It’s convenient, but if you use your computer in public or leave it unattended, you might not want people being able to see that personal information. With a little policy editing, it’s easy to hide.
The lock screen itself does not show your login information, but with just a click or tap, anyone can reveal the login screen that does. And if you’ve taken steps to disable the lock screen, your information is even more exposed to prying eyes. By default, the login screen shows your name and email address (or username if you’re not using a Microsoft account) and whatever picture you’ve associated with your account. If this is information you’d rather not have passers-by privy to, we’ve got the fix.
Home Users: Hide Personal Information on the Log On Screen by Editing the Registry
If you have Windows 10 Home, you will have to edit the Windows Registry to make these changes. You can also do it this way if you have Windows 10 Pro or Enterprise, but just feel more comfortable working in the Registry. (If you have Pro or Enterprise, though, we recommend using the easier Group Policy Editor, as described in the next section.)
Standard warning: Registry Editor is a powerful tool and misusing it can render your system unstable or even inoperable. This is a pretty simple hack and as long as you stick to the instructions, you shouldn’t have any problems. That said, if you’ve never worked with it before, consider reading about how to use the Registry Editor before you get started. And definitely back up the Registry (and your computer!) before making changes.
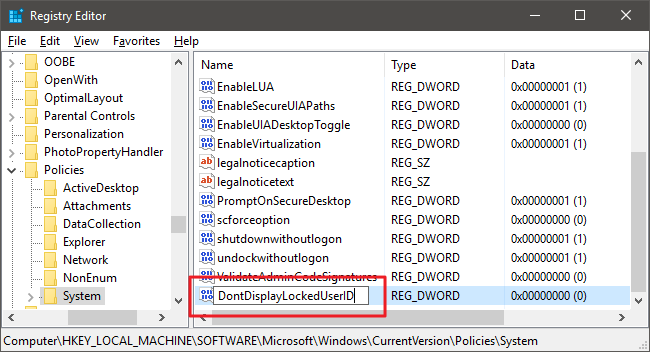
To get started, open the Registry Editor by hitting Start and typing “regedit.” Press Enter to open Registry Editor and give it permission to make changes to your PC. In the Registry Editor, use the left sidebar to navigate to the following key:
HKEY_LOCAL_MACHINE\SOFTWARE\Microsoft\Windows\CurrentVersion\Policies\System
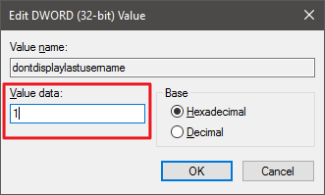
In the list of items on the right, find the dontdisplaylastusername value and double-click it.

Set the value to 1 in the “Value data” box and then click OK.
Next, you’re going to create a new value inside the System key. In the left pane, right-click the System folder icon and choose New > DWORD (32-bit) Value. Name the new value DontDisplayLockedUserID.
Now, you’re going to modify that value. Double-click the new DontDisplayLockedUserID value and set the value to 3 in the “Value data” box.

Click OK, exit Registry Editor, and then restart your computer to see the changes. When you log back in, you should see no user picture or name. You’ll have to type your email address and password to log in every time.

If you change your mind and want to show this information on your login screen again, follow the same instructions, but set both the dontdisplaylastusername and DontDisplayLockedUserID values to 0.
0 comments:
Post a Comment